I'm sharing a short video I made for the folks on Ravelry, showing how I do my heels with the "no wrap" method. This is just one of many ways to make heels, I find it the fastest and easiest, and it avoids any holes left at the heel. I don't wrap the extra stitch when I do toes, but some people do.
Monday, April 27, 2009
Wednesday, April 22, 2009
International CSM Directory
Juana has compiled over the years an extensive directory of the people who have CSM machines and what types. It's handy to try to find other CSM'ers out there who may be generous with their time and help you if you're a beginner. You can also use it as a beginning to try to coordinate your own crank-in if there isn't one close to you.
Go here and fill out her form.
Go here and fill out her form.
Thursday, April 16, 2009
Cylinder Diagrams
In both the Auto Knitter handbook and the LeGare handbook, you will see a strange circular drawing. There's a lot of information on these little buggers.
Here's the one found in the AK book:
 Here's the LeGare figure:
 There are two differences in the sketches.
The other nice thing about these diagrams is that they show you where the sweet spot is located to hang your heel weights. Look inside the circle near the bottom. You will see a small "a" and "b". They're shown to be placed between needles the second and third needles on either side of the heel/toe. For what it's worth, I like to put another heel weight between these two points.
Here's the one found in the AK book:
 Here's the LeGare figure:
 There are two differences in the sketches.
- The LeGare shows to pull more needles out of work for the toes.
- The LeGare shows to work the toe on the back of the cylinder. The only problem I see with doing that is that you get your seam on the bottom of the foot rather than on the top.
The other nice thing about these diagrams is that they show you where the sweet spot is located to hang your heel weights. Look inside the circle near the bottom. You will see a small "a" and "b". They're shown to be placed between needles the second and third needles on either side of the heel/toe. For what it's worth, I like to put another heel weight between these two points.
Tuesday, April 14, 2009
Dropped Stitches: Part 1 - Short Runs
The first installment of what I plan on making a 5 part series on dropped stitches:
This post is Part 1, and covers short runs from a single dropped stitch (ideally, what you get when you catch them quickly). I apologize in advance for my choice of yarn - I was looking for something easy to see that wasn't too bright for the camera, and what I found in my stash was this blue cotton slub (it's labeled as 3.5/1 weight, which is "about" fingering weight.. maybe a little lighter since it's cotton). Not the ideal CSM yarn by any means, so if it doesn't look like anything you're using, that's why.
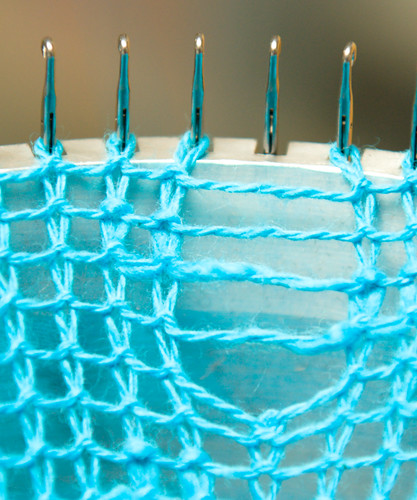
A sample of what kind of drop I'm referring to - in plain knitting, a single stitch is dropped, and the run created is at most 4 or 5 rows long (sample shown is 4 rows).
Stopping the Run

First, before doing anything else, REMOVE the weights on your machine - this helps keep the run from extending further. Then, using a spare needle, run the needle under the yarn from the top of the cylinder, and hook into the stitch a row or two below the run (in this photo, I've hooked the stitch 2 rows below). This stops the run, and unlike trying to catch the stitch peeking out at at the end of the run, usually won't cause the run to unravel further. Using your fingers or a pick, gently pull out the stitch or two above where you've caught your needle so you can begin latching the stitches back up.
- Part 1 - Short Runs (this post)
- Part 2 - Long Runs
- Part 3 - Dropped rib stitches
- Part 4 - Dropped stitches while knitting heels/toes
- Part 5 - Multiple Dropped stitches
This post is Part 1, and covers short runs from a single dropped stitch (ideally, what you get when you catch them quickly). I apologize in advance for my choice of yarn - I was looking for something easy to see that wasn't too bright for the camera, and what I found in my stash was this blue cotton slub (it's labeled as 3.5/1 weight, which is "about" fingering weight.. maybe a little lighter since it's cotton). Not the ideal CSM yarn by any means, so if it doesn't look like anything you're using, that's why.
Short Runs
A sample of what kind of drop I'm referring to - in plain knitting, a single stitch is dropped, and the run created is at most 4 or 5 rows long (sample shown is 4 rows).
Stopping the Run
First, before doing anything else, REMOVE the weights on your machine - this helps keep the run from extending further. Then, using a spare needle, run the needle under the yarn from the top of the cylinder, and hook into the stitch a row or two below the run (in this photo, I've hooked the stitch 2 rows below). This stops the run, and unlike trying to catch the stitch peeking out at at the end of the run, usually won't cause the run to unravel further. Using your fingers or a pick, gently pull out the stitch or two above where you've caught your needle so you can begin latching the stitches back up.
Re-Knitting the Dropped Stitches

You may want to hang your weights back on for this portion, as it helps to have a little tension on your work (you could pull down with your hand, but I find I often need that hand to help manipulate the latch on the needle). To form a stitch, you push the needle through the loop until the loop clears the latch, then make sure the needle latch closes over the strand of yarn from the row above. Pull that strand through to create a new stitch. Continue until you've latched up all the dropped rows. In the sample image I've latched up one row, and I am about to pull the yarn through from the next row.
Hooking Work Back on Needle
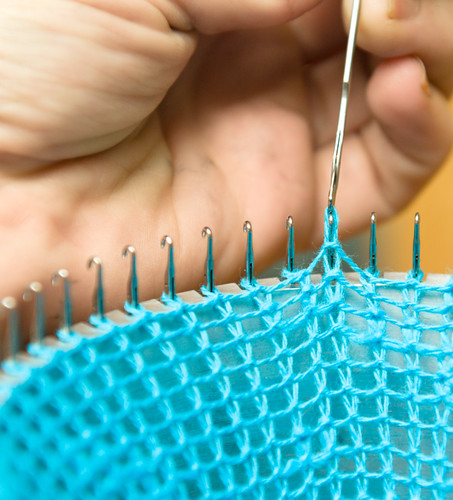
Once you've latched up all the dropped rows, simply pull the last loop over the needle it was dropped from. Before doing this though, you may want to inspect the needle for any problems (such as burrs or a bend latch) that may have caused the dropped stitch, and replace the needle if necessary.How To: Remember Cylinder Tension
This came from the sockknittingmachinefriends yahoo group.
To remember how to adjust your cylinder tension:
* higher-tighter, lower-looser *
To remember how to adjust your cylinder tension:
* higher-tighter, lower-looser *
Monday, April 13, 2009
Books: Knock Your Socks Off of Your Circular Sock Machine

Christine Smith wrote a book and has self published. It's available here. The first 15 pages are available for a free preview.
Here's a quick screenshot of her table of contents.

Wednesday, April 8, 2009
Troubleshooting: Needle's won't grab yarn to knit
On Ravelry, someone posted this photo of their machine and asked why it was doing what it's doing:
 So, lets try to trouble shoot this.
There's knitting on the machine, so the machine is knitting.
Whenever this happens to me, there's one of two things wrong:
 So, lets try to trouble shoot this.
There's knitting on the machine, so the machine is knitting.
Whenever this happens to me, there's one of two things wrong:
- The tension is too tight - adjust the tension screw down to loosen up the knitting. By loosening the tension, the weights should bring the loops down to where they're evenly distributed.
- The weight has hit the ground or is hung up somewhere - the fabric behind is not being pulled down uniformly.
Subscribe to:
Posts (Atom)
